Tuesday, December 23, 2014

Holiday Sewing: Custom Asymmetrical Men's Vest

Merry Christmas!

I've been a busy bee this year, and I've grossly neglected my blog. However, I have posted my projects on my other pages so you can see what I've been up to here, here, here & here.  Next year, I'll do better, I promise.
I decided  to leave 2014 on a high note and show you all a vest that I made for my brother.
It was his design concept and I just did all the heavy lifting, like drafting, sample making, and construction.
Please note that I've never taken a formal pattern drafting class.  I've picked up what I know from years of sewing, viewing videos, blogs, tips, etc..but primarily by the grace of God.
I think that my techniques are somewhat unconventional at times as I often modify commercial patterns to avoid having to create a sloper, but as long as it gets the job done I do what I feel works.

Case in point:

My brother decided to pick out his own fabrics. Well… he picked a STRETCH velvet and a silver lame jacquard paisley fabric. I cringed, but I ended up interfacing the velvet and it stabilized it quite well and the lame was a good complement to the velvet.
The cut is made up of asymmetrical concave curves that I traced on the muslin. I added double welted pockets at the waist and a single welt upper left pocket. The buttons are clear acrylic fashion buttons which add a bit of sparkle. The lining is a poly lining.
I have to add that my brother is a musician, so the drama in this vest is on point.
It took about 4 days total between fittings and pattern revisions and the final look, but I love the result.
He's ready to party!


Final look

Drafted pattern from a commercial vest pattern adding several modifications.
Here I was creating style lines for the separate neck band and hem band.

I cut off the neckband and hem band pieces  along the style lines I drew, then added seam allowances
back and voila!, a Muslin.  Success!

Left front layout.  Welt pockets sewn in and looking good.  It's coming along nicely. 

After adding the neck and hem bands.  I think it's gonna work. 


Brother approved.  Open posture indicates that he is pleased.
You'd never know that this is stretch velvet. 


Thank you for viewing my blog.
Stay tuned for 2015....there's more to see.

Susan

Tuesday, June 3, 2014

Celebrating My Niece's Kindergarten Graduation

I am a proud auntie.  My 5 yr old niece, has just graduated from kindergarten. She got excellent grades as well and is a beloved student at the school.
  
When I asked her mother what she'd wear to the graduation, she said that she got a last minute notice from the school that the attire would be dressy/church wear.

I sprang into action as super Auntie and whipped up a dress for my niece in her chosen color, pink.I hadn't measured her in a while so I guessed at her size and made her dress in a size 5.   She had a piece of her great grandmother with her as the flower she wore was from the 100th birthday celebration for my grandmother.  That made it oh so special.

I was so happy to see that the dress fit her perfectly and she loved it!  She's a very active little girl and she buzzed about....a lot, so I was so glad that the embroidered organza and satin fabrics I used, could take the abuse and still look great. 
The photo below was taken just after the ceremony was over.


Wednesday, November 2, 2011

Menswear by Metropolitan Frock: The button back shirt

I've really missed Etsy's Alchemy. It was a great place for people to ask for whatever they wished to be created by a talented Etsy artisan at a fair price. And it was a great place for someone like me to make new and interesting garments or crafts for someone who's desired item didn't exist or was hard to find. 
Well they've brought it back...sort of.  About a month ago, I joined the Etsy team called Custom Order Corner:  The New Alchemy.  The same principals apply, a requestor posts a thread requesting to have something made; An artisan sends a convo to bid on the item(s); The requestor selects the perfect bid and negotiates the details with the artisan and then the fun begins. 
For the past month, I've had the unique opportunity to work with a fellow Etsyian to create a stylish men's shirt that he saw online.  

 Here's the original inspiration shirt from a French website (go figure)

Work in progress...Elements of the first concept

And the second...I shipped this sample for him to try on for "size". Hmm...minor problem with the dimensions. 


Third times the charm...Redrafted pattern and made the necessary adjustments, i.e. shorten sleeve about 2", narrow cuff ~1", taper waist to a slimmer fit & bring in shoulder about 1/2 on each side. First virtual fitting I've ever done. :)  
Success! Fitted to perfection!


The client was very pleased (despite the serious look) and I was totally shocked and thrilled with the result. 

Maybe I'll delve a little into menswear again for a while. 

Peace,
Stay tuned, there's more to see! 


Saturday, August 6, 2011

New Adventures in Pattern design

Okay, I know it's been half a year since I've blogged, only because I have had a lot going on lately. Fast forward, what I'm doing now is learning Transformational Reconstruction pattern design techniques. It is a technique developed by Shingo Sato of Tokyo.  I have been having so much fun with it. Actually I'm learning a lot about pattern making through using this technique using ready made patterns.  I'd previously had some difficulty learning flat pattern-making, so this technique opened my mind to the art of displacing darts in order to achieve different sculptural or artistic shapes in my garments. Thanks to this technique, I understand the concept much better now.
There are a group of videos on youtube showing examples of the TR pattern design process. There's also a book available with DVD's at www.centerforpatterndesign.com.  I've purchased the book, and I'm waiting on it to arrive, so I'll share some of it with you when I get it. 
I've done a little experimenting already and I have a couple of projects to show you. 

1.  Here's my take on a 3d design draping technique. I'm happy with the way it turned out for a first try, but next time I'll add less volume.  I used a scrap of brown satin, which I backed with black cotton.


2. After trying the bodice, I thought I'd learned a little something, so I decided to try removing the dart    from a pencil skirt pattern. I wanted to add a contrast design in the skirt so I cut a modified diamond shape in the front and back.  I used a fun cotton print I had on hand and black pique fabric. 
 Front-close up
  Back-close up
 Front-full view
 Back-full view

Sorry, I don't have the step by step photos. I was anxious to get it done. I'll be sure to take photos and explain the process next time. 

TTYL...Stay tuned, there's more to see.

Peace, 
Susan

Friday, December 31, 2010

New Year...New Evolution

Good bye to 2010.  Wow what a year.  So much has happened this year, I could hardly keep up. With the economy the way it is, the natural disasters, and other losses we have experienced as a country, it seems that one could loose hope in the future.  I've learned that when I press my way through a situation, feeling, circumstance, and believe and act out the truth that I know, I make it through OK and things NEVER turn out the way I imagined they would.    It is said best in Hebrews 10:36  - You need to persevere so that when you have done the will of God, you will receive what He has promised.
It is my hope that you too will press through in the coming year. Minute by minute, hour by hour and day by day you'll make it to your promise.  -Peace

Thursday, October 21, 2010

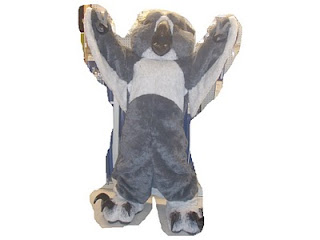
Project: Hootie the Owl

I haven't posted in a while.  Only because it seemed as if no one was interested (except my one faithful fellow blogger), but I have been busy creating some wonderful things and even if I have to be the only one who wants to read about it, so be it. 
Here's a  my latest post for my Burdastyle page: 
High School Mascot Costume -This was a collaboration between David Caimbeul (Head & Feet) and Metropolitan Frock (Body). It's a cool story really. I met David on Labor Day at Hancock Fabrics, while there with another designer friend of mine. He asked a few questions about how to proceed with making the body of his costume...I gave some pointers and 6 weeks and 2 days later Hootie was born. We're both working professionals and had to squeeze in time to work on the project. We used Hancock as my office for fittings and delivery. The guy is ultra talented. He made the head from heavy duty packing foam and even installed a fan in the head to prevent overheating. I was blown away at the end result. This was by far the most fun I've had creating a project. I truly love helping other's visions come true. If you're in TN, check out the event where Hootie will be dedicated to David's Alma-mater.The event is on Friday, October 22nd.  See Facebook invite here Hootie the Owl.
I'll have better pics once the event is over so.....Stay tuned, there's more to see.

Wednesday, April 28, 2010

It's here! - Our first PDF Pattern: The One Seam Sundress

It's finally done. Our first PDF pattern, The One Seam Sundress. 
This dress is amazing! It is flattering on most every woman’s figure. It’s the Maxi of all Maxi’s:
Introducing The One Seam Sundress* from Metropolitan Frock & Marian Collier Collections (www.mccollections.etsy.com).

Print it; Cut it; Sew it; Wear it - within 2 hours!
We are excited to bring to you our most popular sundress in a PDF pattern. You’ll love the versatility of the dress and the fact that it works with many fabric types and prints. It has no zippers, buttons or hooks, so it‘s super easy to make. Print your pattern and make as many as you like. Size XS-XL are included. 

Buy it now at Metropolitan Frock or Marian Collier Collections


Stay tuned...there's more to see!
Peace, 
Susan

Related Posts Plugin for WordPress, Blogger...